A notebook is a record sheet where you can insert a note of any length for each student.
1 Application for editing student's notebook.
The student can view their record if you allow students to access the notebook’s content,
The Information system Student [course selection] Notebooks
or you can keep the notebook unpublished for your own use. The contents of the notebook can be attached to a bulk letter to students (records are displayed in the application and added to the email for each student individually).
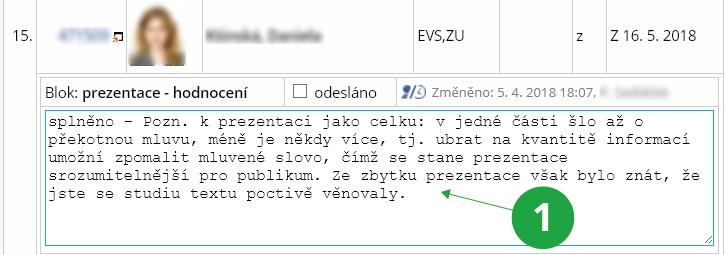
The notebooks also support continuous assessment throughout the semester – awarding points. If the notebooks contain numbers with an asterisk (e.g. *23, *-1, *5.4), the applications understand them as points, can automatically add them up, display statistics and graph. After entering the grading scale, they can suggest grades and transfer them to the Evaluation application.
Typical uses:
your own notes on submitted papers, exams, etc.,
comments on worked out credit examples, requests for corrections – publish to students,
classroom/exam seating chart, which you will email to students in advance,
scoring of tests and assignments.
If your assistant is correcting papers, enter him/her as an "Assistant" in the Course Catalogue:
The Information system Teacher [course selection] (Course Catalogue) Edit teacher-related data
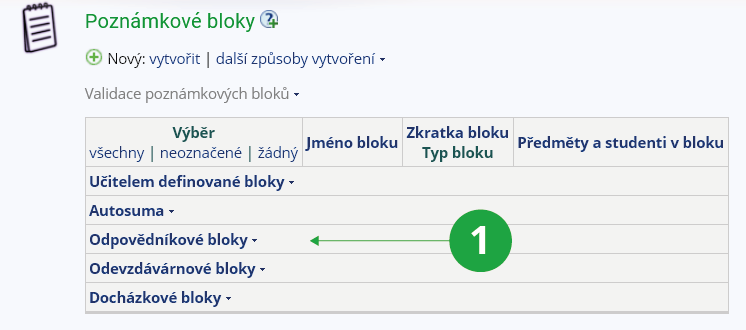
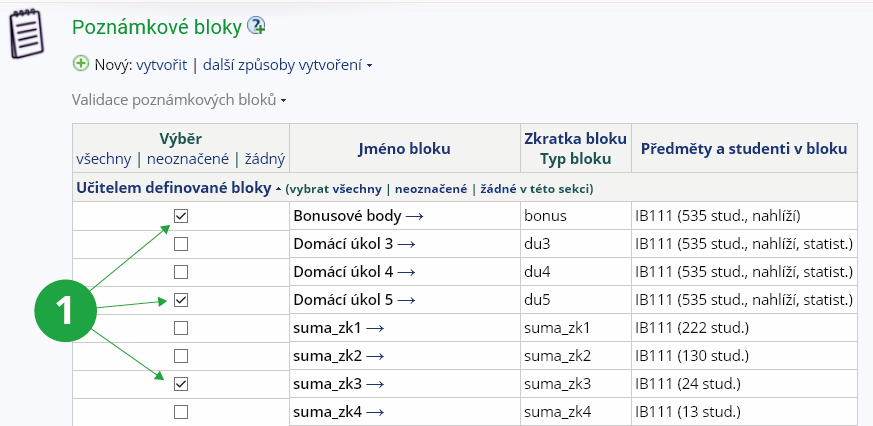
When creating a notebook in a specific application, the notebook is assigned a shortcut that classifies the notebook into one of the following types. In the application, you can then choose to sort the notebooks according to these types, making it easier to navigate. Notebooks can be sorted not only by type, but also by notebook name or abbreviation by selecting it in the notebook header. In addition, you can select and perform other operations only on a selected group of notebooks. The division of notebooks is as follows:
Teacher-defined notebooks – this group includes all notebooks that have been created by the user directly in the Notebooks application.
Automatic addition – Autosummary notebooks sum the contents of designated notebooks at regular intervals.
ROPOTs notebooks – contain the scores from the ROPOTs. Their content can be changed and rewritten at any time, e.g. by changing the ROPOT description setting.
Homework vault notebooks – these notebooks can be created via the homework vault management application. They are used to enter assessment for submitted student files.
Discussion forum notebooks – notebooks assigned to topic discussion forums. They are used to enter assessment of student activity in these forums.
Attendance notebooks – notebooks used to record attendance in class.
Categories are only listed if there are notebooks associated with them.
The teacher is allowed to create any number of notebooks. A notebook is identified by name and is assigned to a specific course in a specific term. In the Teacher's Notebook, select the notebooks you want to work with or create a new notebook.
1 Select the notebooks you want to edit.
Take advantage of operations in
The Information system Teacher [course selection] Notebooks
New: create | create and pre-fill | create by copying | create with evaluation of another course | create by adding up scores stored in different notebooks
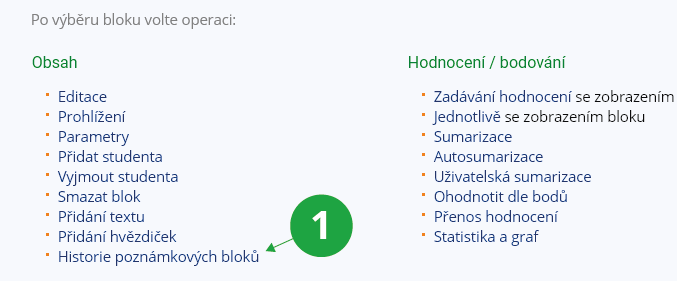
Edit settings: settings | add a student | remove a student | delete the notebook
Contents: edit | browse | add text | add asterisks
When creating, you need to specify
name of the notebook,
whether the student can view his/her record in the notebook,
whether the student can look at the overall statistics (in the form of rankings and point counts),
whether students should be added during validation
optionally, you can set the date and time from which students can view their notebook record and the statistics.
It is not recommended to set up notebooks in the first weeks of the semester (unless necessary) when the list of students in the course is not complete. Otherwise, it will be necessary to use validation afterwards (see also below,
on validation). You can create a notebook in multiple courses at the same time (enter the application with multiple courses selected at the same time).
When editing the content, you have a line containing the student's name, the programmes studied, how the course was completed, and the grade if already entered. If you have multiple courses or multiple notebooks selected at the same time, then the course code or notebook name will also appear. You can also edit the contents sent flag individually.
If you do not want to edit the notebook, but only view it, select Contents: browse.
You can also add text or asterisks to the notebook in bulk (the number behind the asterisk will then be treated as score).
If you enter the application to create a notebook with a filtered list of students, the application will offer the option "I want all the students enrolled in the course to be included in the notebook." If you intend the notebook to be only for students of a seminar group, an examination date, etc., do not check the box. On the other hand, check "do not add missing students (programmes of study) to the notebook during the validation process" so that you do not extend the notebook to all students (see also on validation
below).
The Information system Teacher [course selection] (Notebooks) Import/export
Send email
sends out a bulk letter, stores its common body for future use. In the letter, the content of the specific student's notebook is placed in place of the <BLOK> tag you inserted.
You can use the option "send the message without saving it" if you know you don't want to use it as a template in future years. When you enter the application, you can select from all your last saved drafts, as well as drafts saved this semester by the co-teachers of this course. Use "save the message as a new one (do not rewrite the original used)" to save a new draft. A saved draft can be deleted at any time.
Contents-sent flag
The notebook also includes a flag for sending a letter. The flag is recorded separately for each student entered in the notebook. This flag is set by the application sending the contents of the notebook by email whenever the corresponding content is sent to the student.
When sending the contents of a notebook, you have the option to check „do not send the message to the students with the contents-sent flag“.
This will ensure that the letter is not sent to those to whom it has already been sent once. By default, it is always sent to all students introduced in the notebook (or only those to which the selection has been restricted).
When sending a notebook, you also have the option to check „do not add the contents-sent flags to the notebook after sending the message“. In this case, the send flags are not set.
In bulk, flags in selected notebooks (all students or just a filtered list) can be deselected using the Remove the contents-sent flag. application. Individually, you can deselect it when you edit the content.
Incorporating the notebook content into the body of the letter
The contents of the notebook belonging to the student to whom the letter is being sent are placed either at the end of your letter or where you write
<BLOK>
. The content can only be inserted once in the letter in this way. The content is always inserted on a separate line, i.e. a newline character is inserted before and after the content.
Tip: Example: Incorporating the content of a notebook in the body of a letter
Subject: results of intermediate examination 15.5.2020
	    Text of the letter:
      Hello,
      The test on 15.5.2020 turned out to be harder than I expected, many of you made a mistake in the second example. I
      will explain the correct solution again in the next lecture. You were to solve a total of 5 examples, I attach the
      scores of each example and the total number of points obtained for this paper:
      <BLOK>
      Sincerely
      Michal Brandejs
When such a letter is sent, the line with the <BLOK> tag is replaced by the content of the notebook belonging to a specific student and the text of the letter will be e.g:
Subject: results of intermediate examination 15.5.2020
	    Text of the letter:
      Hello,
      The test on 15.5.2020 turned out to be harder than I expected, many of you made a mistake in the second example. I
      will explain the correct solution again in the next lecture. You were to solve a total of 5 examples, I attach the
      scores of each example and the total number of points obtained for this paper:
      3 -2 1.5 2 4 *8.5
      Sincerely
      Michal Brandejs
The application sends a maximum of one letter per individual per operation to send the contents of a notebook, regardless of how many times their study occurs in the selected notebooks. If the individual occurs in the selected notebooks only once, only the contents are inserted in place of <BLOK>
(or after the end of the note). If the person appears more than once, all the contents belonging to the person are inserted on separate lines, followed by the study identification and the course code.
Enter evaluation (notebook content displayed) is an alternative application in the Notebooks section of the Teacher's Notebook, which allows you to add your desired notebooks to the web form for your information and then fill in the evaluation manually more conveniently.
Go to
The Information system Teacher [course selection] (Notebooks) (Evaluation/Scoring) Enter evaluation (notebook content displayed)
and then select the notebooks to be displayed into the form. You can also choose whether to display the notebook in a row or a column. We will keep those notebooks in a row that contain more information and that are not appropriate to display in a column. To change the row/column display, click on "select some other notebook(s)".
It is possible to set the parameter „Is 'requirements fulfilled' recorded in a notebook?“.
in the course catalogue. Then the Notebook will offer to create a notebook where the auxiliary "requirements fulfilled" is recorded. When the course is evaluated, the "Enter evaluation (notebook content displayed)" application is then used to visually check whether the auxiliary requirements fulfilled has been awarded.
In general, any information can be entered into the notebook. However, if you use an application that works with points (statistics, graph, summarization, evaluation), then it will search the contents of the notebook for sequences of characters starting with an asterisk (*) followed by numbers, a minus sign (-), a decimal point (.) or a decimal comma (,). This sequence may occur anywhere in the content and any number of times. Examples of allowed point value notations:
*23
             *-14
             *3.5
	     *8,2
A scoring assessment beginning with asterisk can appear anywhere within the text, e.g. it is allowed:
The 1st example was worse *3.5, the 2nd was better *8 and the *third* was the best *100!
If you enter multiple point values in one content, they are always added together first before being used again. The values 3.5, 8, and 100 are selected from the example line for addition purposes (so the sum is 111.5). Numbers not immediately preceded by an asterisk are ignored when processing points; likewise, asterisks not immediately followed by a digit, minus sign, period, or comma are ignored.
Negative numbers and decimal numbers are allowed. Decimal numbers must contain a decimal point or a decimal comma. Often, rounding to two decimal places occurs in the subsequent processing of decimal numbers.
The application loads the specified notebooks either in their entirety or only a limited list of studies. It only processes content that contains at least one score (the number after the asterisk). If more than one score is found in the content, then they are added together before use. From the values found, an overview statistic is calculated, or a graph is displayed according to the user's instructions.
Tip: Bulk addition of asterisks
You can also insert asterisks in front of selected numbers in the notebook using the application.
The Information system Teacher [course selection] (Notebooks) (Content) Add asterisks
You can also record the resulting grade in the notebook. It must be preceded by an at sign (@). Allowed grades are
-1234ABCDEFNPUVZ
(can also be lowercase). If you want to insert multiple evaluations (from multiple examination dates) into the content, you need to insert the at sign before each one, e.g.
@F @E
If you use scoring, use the application
The Information system Teacher [course selection] (Notebooks) (Evaluation / scoring) Evaluate on the basis of scores
Define the grading scale: for each course completion and each grade, specify the minimum number of points the student must achieve for it. The specified intervals are saved as default for all selected courses (the application can be accessed with multiple courses at once).
The notebook used in this application must have the number of points correctly introduced with *, if there are more than one on a line, they are added together. The application copies the notebook to a new one and adds a "@grade" entry at the end according to the number of points found in the notebook.
1 Application for entering the score according to the score threshold after the sum of the points in the notebook.
The following flags can be used to modify the way the evaluation is done: the "do not add any grades (evaluation) to the students who have already gained some" flag means that if there is already a grade after the @ sign on the line, then the content evaluation is not calculated, and no further grade is added at the end. If you check the flag "use '@-' if no score is found", then for each of processed content that does not contain any scores, a "did not attend" score is added, i.e. "@-".
The grade transfer application retrieves the specified notebook and searches it for all grades after the @ sign. If there are multiple grades in the content of one student's notebook (after multiple at signs), then they are combined into a grade string in the order they appear in the content of the notebook.
The application always addsgrades to the evaluation. That is, it will repeat the grades in the evaluation when you rerun it, which is probably not the desired behavior. If you need to replace the assessment with data from the file (not add it), you need to use the application to import the evaluation (without using notebook).
When the application is opened, a mock assessment is transferred, and any error messages are displayed. After clicking on "Transfer the grades (evaluation)", the error-free grades are added.
The Information system Teacher [course selection] (Notebooks) (Content) History of notebook-related operations
Then select the notebook for which you want to view its history. Through the application, you can follow the sequence of operations with the notebooks of the selected course. You can use it in case of doubts about the operations performed.
Add up scores stored in different notebook is an operation that creates a new notebook, copies the point values from the specified (multiple) notebooks into the notebook, and adds the values. This is a one-time action.
Automatic addition is an operation that creates a new notebook, copies the point values from the specified (multiple) notebooks into the notebook, and adds the values. The data in the newly created notebook is recalculated every hour unless the recalculation is exceptionally prevented by the current increased system load.
When you enter the application, you select the names of the notebooks to be used to create the (automatic) addition notebook. You can only select from notebooks that have at least one content with a score.
A notebook is created containing students who had a non-blank score in at least one of the added notebooks. This can be changed by checking the "only those with a score" flag for the appropriate notebook. Then students with a blank score in the ticked notebook will not be included in the resulting notebook.
In the resulting notebook, data in the form e.g.
23| -2|12.5| | 10| *43.5
In this case, five notebooks were added together, and the fourth notebook had a blank (unentered score). After the asterisk, the sum of all the entries is inserted, in this case 43.5 points. The vertical line is a visual separator of the individual input notebooks.
Customized addition is an operation that creates a new notebook that contains the result of the operation defined by the bc script.
When you enter the application, you can see all the available notebooks that can be used to create the resulting notebook. You can only use notebooks that have a score in a form of *34 in at least one line. To select only students who have a non-blank score in a given notebook included in the calculation, mark the notebook "only those with a score". Thus, only students with a score in the notebook marked as such will be included in the resulting notebook. To select students in a particular notebook, mark the notebook with the "only students in selected notebooks" flag. The resulting notebook will include students who have scores in at least one of the notebooks so marked.
Unlike simple summarization, it is possible to perform more complex calculations using a bc script.
Example of use: you want to determine the result of condition met from several tests, each of which has a different contribution to the grade. You have two tests, each of which can score a maximum of 100 points. Their results are recorded in notebooks called test1 and test2. The first test has a 25% share of the grade, the second test has a 75% share and the student must achieve at least an 80% pass rate. In the "Enter a custom bc script" field, enter the command
print "*"; 0.25*test1 + 0.75*test2;
if (0.25*test1 + 0.75*test2 >= 80) print "@Z" else print "@N"
and run the script.
The result notebook will display the corresponding number of points in the form *12.3 that the student has obtained in both tests and at the same time it will determine the grade (Z or N), which you can then use the "evaluation transfer" to write to the students.
If you want the resulting customized addition notebook to be updated periodically (typically when variables in source notebooks are changed), it is possible to check the "vyhodnocovat opakovaně automaticky" option when creating it (i.e. evaluate repeatedly automatically in Czech). The resulting notebook is then recalculated regularly every hour.
If you want to recalculate the customized addition notebook immediately, select the rotary arrow icon after the notebook name.
An immediate recalculation will occur and you will be informed by a "re-calculated successfully" message.
The notebook can be printed on a properly set up printer (provided by the faculty LVT) or saved to a Postscript file. You can choose to print to a row or to a column.
Exporting a notebook gives you a file containing your notebook in a format that you can process outside the IS, e.g. with Excel on your computer. After you have added information to the file (e.g. after entering the score for a test), you can load the contents of the notebook import operation file back into the IS.
The produced file contains columns in the following order:
učo (university identification number) of the student
surname and first name of the student
abbreviation of the field or fields of active study
course code
flags: 'opak' and 'znovu' for repeating a course and 'isp' for an individual study plan
enrolled course completion
identifier for information system – do not change!
the current contents of the notepad line
Columns F (6.) and H (8.) are important for reading back the contents of the notebook. The others are insignificant. If you change or delete an identifier, the contents will not be loaded.
With the notebook import application, you enter the contents of a notebook that you have processed/filled outside the IS, e.g. in Excel on your computer, into the IS.
This application can only load a file that was created by the notebook export application. This file must retain the student and course identification column. Importing into a notebook will irreversibly overwrite the existing data in the notebook.
When outputting from Excel, it is necessary to select the tab-delimited text output format. The Excel workbook will not be accepted by the application.
You can have a notebook of just one name in one file, even if it belongs to multiple courses at the same time. However, when importing a file, you must first select all (or more) courses that appear in the file. That is, you must have the courses into which the contents will be imported listed in the page header. If you don't have any there, you will probably get an error message "You don't have permission to the course".
When importing a file, only some columns are read. Columns are separated by tab or colon (:). They are numbered from one. Two or more columns are relevant for import. The first mandatory column is the identification string.
It contains a unique identifier associating the evaluation with the course, the period, the individual, his/her study and the course enrolment. This data must not be changed in the process of processing the assessment outside the IS. The first number of the identification string is the student's učo and the second is the course code. The identification string contains some extra data in order to recognize an inadvertent change of the identification string as an error. In the form above, you must set the sequence number of the identifier column. If you do not fill it in, it will be an error. The pre-filled column number value corresponds to the column number where the identifier is inserted by the export application.
The second mandatory column is the content column. You can specify more than one content column number if you are processing the exported notebook in Excel and you have your own data in multiple columns. When importing the notebook, all the columns you specify are taken and combined into one content column (separated by a single space). The imported file must not contain the ¨ character (single consonant).
If more than one row is stored for one student, i.e. the content is made up of multiple rows, the so-called continuation rows are created when exporting to a text format separated by colons (not for Excel!). The continuation line starts with the character "|" (vertical bar) in the first column. The notebook can also be loaded in the same form.
We recommend that you import at least twice. On the first attempt, leave the default "try without saving - used for checking purposes". No changes will be made in this mode, but all error and informational messages will be displayed.
If you select "import and save", then the contents of all the correct records will be imported. Erroneous ones are left unchanged.
If you discard some rows from the exported file, the content of the notebook in the IS is not changed when importing the discarded students. Only the contents of those students and courses that are listed in the identification string are imported.
If in Excel you need to add "*" before numbers in a specific column to indicate a further processable point value, proceed as follows (in Excel): select Format -> Cells -> Number tab -> Custom -> enter e.g.
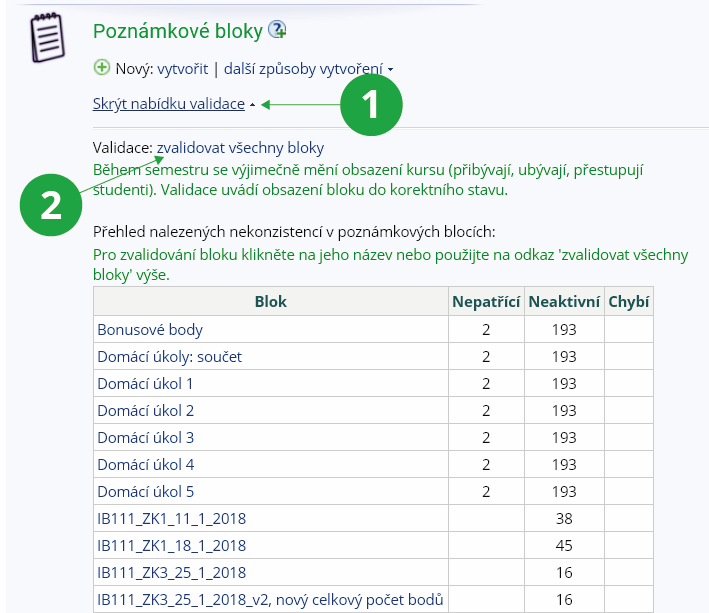
The list of students in a notebook is static, it is created when the notebook is created. However, the occupancy of the course changes in the first weeks of the semester or even later. Validation is the process that puts the occupancy of students in a notebook into a correct state. A table of this type will appear on the front page if an inconsistency is found:
1 Expand/hide the validation options.
2 If an inconsistency is found in the notebook you can use "validation".
Operations:
automatic validation
is automatically executed when entering validation. All situations that are not of (probably much) interest to the teacher are automatically resolved in the first step. These situations include: a student's course enrollment was cancelled by the study department and then reinstated; a student's study was deactivated, a new study was created, and the student was enrolled in the course in that study. All these operations performed will be listed on the teacher's information page. It is recommended to study this information. If you find something in them that you do not understand, you can ask your study department. A list of study departments can be found at
https://is.slu.cz/studijni/.
add the listed students to the notebook
These are usually students who did not have the course when the notebook was created and now have the course already enrolled. If you do not want to add students (you have a notebook for a certain seminar group only), select "do not add missing students (programmes of study) to the notebook during the validation process" when defining the notebook.
to remove students who do not belong
Note that if the "Date of last change of study status" is close to the current time, it is possible that the study department is, for example, transferring the student to another programme. Wait with the operation, you would lose the contents of the block of students affected in this way.
Any of the above operations may not be displayed or executed if there is no case to be solved by the operation.


 slu
slu cz
cz