- 1.How do I create a description of the ROPOT and where do I place it?Once you have created a question set, access the work with ROPOT pages usingThe Information system Teacher [course selection] (ROPOTs and Quizzes) Work with ROPOTClick on "Create a new answer ROPOT description" and select the mode (exercises, PC-based test, ...) according to the intended use. The choice of mode affects the presetting of less relevant options with typical values for that use. If the course already contains some ROPOT descriptions, you can use one of them as a template and have the new description preset according to it. Just select the description in the list instead of selecting a specific mode. Finally, press the "Select" button to enter the form to enter the parameters.The description of the ROPOT has the extension .qdesc (questionnaire description). By default, it is stored in the study materials in the folder ROPOTs/testbank, which students do not have access to. If you want to change this location, click the "Change" button located right at the beginning of the description next to the existing address.
The selected mode and its preset values are only indicative, you can set all properties freely. For example, in the PC-based test mode (for real testing) it is not usual to tell students the correct answers, but you can.
- 2.What name should I choose for the ROPOT and how do I attach a question set to it?The first three items on the form are the name of the ROPOT, the file name and the question set selection.
- Name of the ROPOT application: preferably short and concise; if you wish to save student scores in a notebook, the ROPOT name must be no more than 32 characters.
- Name of file: optional, the IS can create it itself.
- Question set to be used: to enter a set, click on the "Select from all question sets" button. This will display a list of all available question sets in the course, in which you mark the ones you want to use and confirm by clicking "Use the selected". In case you want to insert a set that is not in the Study Materials, enter its address in the box below the "Select from all question sets" button and click "Use" (the "Find" button will help you find the address).
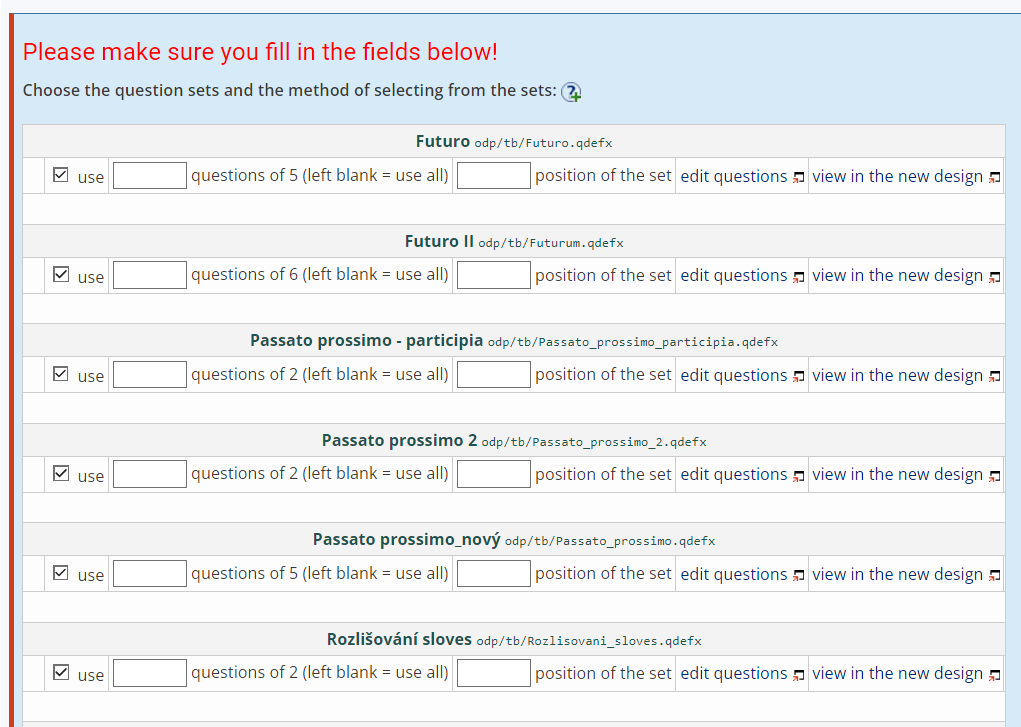
1 Preview of a selection of question sets.
- 3.I want to combine questions from different question sets in one ROPOTYou can use several question sets in one ROPOT at the same time. The procedure is basically the same as for the first question set.
All the question sets you want to use must have the box in the grey rectangle checked.
You can also specify how questions from the set should be selected for the test if you are selecting only a subset of the questions from the set. You can choose either to select them "randomly", to "start from the question", or to take "a block of continuous questions".
Random means that a given number of questions are randomly selected from all questions in the set.
Start from the question means that a given number of questions are selected in the same order as they appear in the set, starting with question X. In the case of non-completion, start with question 1 in the set.
A block of continuous questions means that it is possible to take into account cases where there are always the same number of related questions in a set of "tasks". The number of questions that form a contiguous block in the set is entered (the total number of questions in the set must be divisible by this number). Just one randomly selected block of continuous questions from the set is used.
You set the order of the questions in the student's test (in the session) in the next step in "Order of questions in a new session".
Clicking on the "edit questions" link will open the set in a new window in edit mode. This allows you to quickly check what questions the set contains and, if necessary, edit it for the test.
- 4.How do I tell students the rules for working with the ROPOT?You can enter instructions for using the ROPOT and other information (maximum points, where students can find the results, etc.) in the "ROPOT application instructions" field. Students will be shown these before launching the ROPOT application.
- 5.How do I set up the scoring of answers?
If you do not wish to use the scoring (e. g. for polls or surveys), tick the "do not award any points" box. Otherwise, enter the default number of points awarded for a correctly answered question (ok).
Do you have a score given in the question set? The point values given directly in the question set carry more weight and "override" the ROPOT settings. For example, if you have 1 point in the ROPOT description, but you have two points ("ok 2") for a difficult question in the set, the student will get two points for a correct answer.
Points are awarded for each "ok" separately. So if you have, for example, four answer boxes in one question and the student fills them in correctly, he/she will get 4 times the number of points indicated in the ROPOT description (if you set "1", 4 points). If you want to keep the same number of points for all questions regardless of the number of 'ok's, you can do this by specifying a score in the question set. In our case, this would mean specifying 0.25 for each "ok" (ok 0.25). The value can also be specified using a percentage (ok 25%).
You can also set subtraction of points for wrong answers or unanswered questions.
- 6.How do I get the awarded points into a notebook?
In the ROPOT description, just chose "save/yes" in the " Saving students' scores to a notebook" section in combination with the default score setting. IS SU will automatically create a notebook where the number of points awarded will be saved. Only points are transferred, not, for example, free-form answers.
The "yes" option is further divided into the following options:
- "Save only the score of the last ROPOT session (last test)": this option is mainly used when setting "Yes, they should, but it is always the same form (same questions) that should be offered to them". However, you can also use this option if you are repeatedly setting up new tests, if only the most recent result is important for you and for the students.
- "yes, only the best result (of all the ROPOT sessions)": this option is most often used in combination with "Passed/failed evaluation". The student launches the ROPOT application repeatedly in order to achieve a certain number of points.
- "yes, only the worst result (of all the ROPOT sessions)": used when you want the student to answer only once but have the option to launch the ROPOT application a second time, e.g. in case of a failure. It cannot be used in combination with the "Passed/failed evaluation" option.
- "yes, the results last submitted of all the sessions": only makes sense if you intend to allow students to repeatedly launch new, blank tests (see below). If they take the test once and then just correct the answers (i.e. "update the same form"), the score is always overwritten by the last result.
- "yes, all the results submitted of all the sessions": used in cases where the student passes the ROPOT repeatedly and it is desirable to record the results of all answers concerning one ROPOT. For example, you can keep track of whether the student is continuously improving or deteriorating while completing the test.
- "Save only the score of the last ROPOT session (last test) and the scores gained for individual sets": use this option in exceptional situations where you need to differentiate the points earned from each question set.
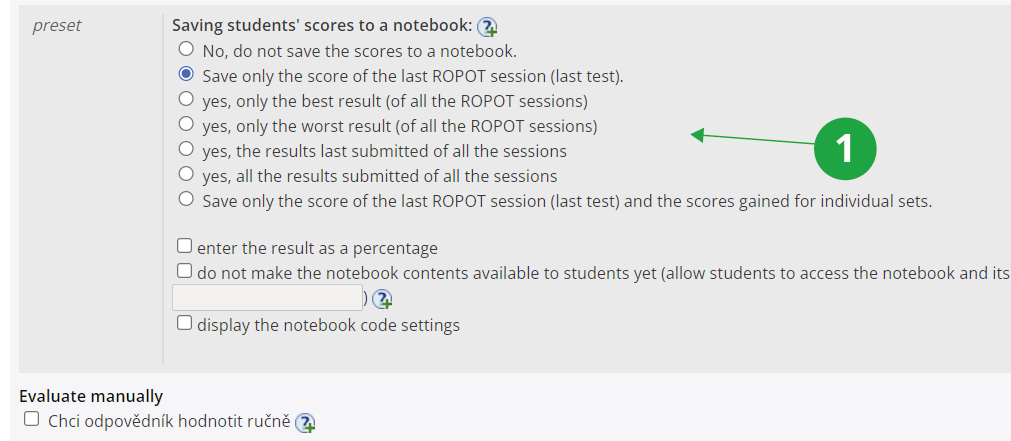
1 Preview the options for saving results to notebook.
If you do not want the notebook, check "No, do not save the scores to a notebook". If the student's answers are not saved correctly (for example, due to a connection error), his/her results will not be entered into the notebook. You can use the "End session in progress" option to additionally enter a partial score (if the student used the Save and continue button in the ROPOT). SelectThe Information system Teacher [course selection] Work with ROPOT [selected ROPOT] responses provided [selected student] End session in progress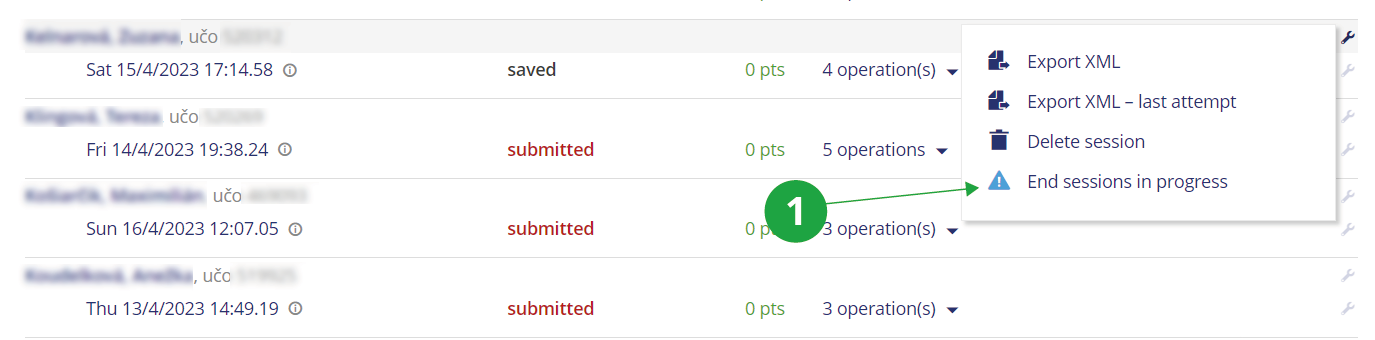
1 For the selected student, you can view the operations via the assembly key icon and select "End session in progress" among them.
- 7.I want to see if students have achieved the minimum required number of pointsTo determine the minimum number of points a student must earn and then check if the limit has been met, enter the required number of points in the "a pass score or pass percentage" field in the “Passed/failed evaluation" section. You can also enter the number of points required to pass the test as a percentage. For example, if you enter "75%", the test will be scored as a pass if the student earns 75% or more of the maximum number of points. At the same time, you need to set the results to be written in a notebook (in the "Saving students' scores to a notebook" section, tick "yes, only the best result (of all the ROPOT sessions"). If a student achieves the minimum score in one of the ROPOT sessions, a *1 will appear in the notebook, which in this case means "passed", not the number of points obtained. If the student does not achieve the minimum number of points, the student will have a *0 in the notebook. Expressing the achievement of the minimum score in terms of ones and zeros makes it easy to see how many ROPOTs a student has completed by adding up the notebooks. You can also list students who have or have not achieved the required number of points. When selecting a course in the "Teacher" agenda, also select the filter "other - students" and specifically "selected by their score recorded in a notebook". Then tick the required notebook and enter the number of points. For a listing of students who have passed the ROPOT requirements, this will be "=1" and for a listing of students who have not passed the ROPOT requirements, this will be "=0". The Teacher's notebook with the selected students will be displayed when you click on "Select". Information about meeting the limit is also displayed to students. At the link to the ROPOT:The Information system Student Teaching (E-learning) ROPOT (Revision, Opinion Poll and Testing)is displayed in green "condition met" or in red "condition not met". Pozor na nastavení, ve kterém zkombinujete procenta nastavená ve „Vyhodnocovat splnění“ a kteroukoliv z možností „ano, poslední uložené výsledky všech průchodů“ nebo „ano, všechny uložené výsledky všech průchodů“ v části „Výsledky do poznámkového bloku“. Při tomto nastavení se splnění vyhodnocuje tak, že se jako základ pro výpočet procenta vezmou maxima bodů, které odpovídající mohl získat, a ten se porovnává s body, které skutečně získal.
Příklad: V odpovědníku lze získat nanejvýš 10 bodů a je nutné jej splnit alespoň na 80 %, aby student v poznámkovém bloku nalezl „*1 splněno“, a přitom je nastaveno, že se do bloku mají ukládat všechny uložené výsledky všech průchodů. Student, který má u takového odpovědníku jedno odevzdání, musí získat alespoň 8 bodů, aby v poznámkovém bloku nalezl „*1 splněno“. Student, který má dvě odevzdání, musí dohromady získat alespoň 16 bodů, student se třemi odevzdáními musí mít dohromady alespoň 24 bodů atd. - 8.Will the questions and the offered answers be in the same order as in the question set?They may or may not be. You can specify in the ROPOT description whether you want to mix the order of the questions. There are three options under the setting "The questions should be presented in the following order:"
- random – randomly shuffles all questions (if you use multiple question sets and have a set order, questions are randomly shuffled from all of them regardless of the question set order!)
- in the same order as that of the question sets they make up, but blended randomly within each of the sets – used when using multiple sets – randomly shuffle questions from the set while maintaining the question set order (if specified). So first the questions from the first question set will be randomly shuffled in the test, then the questions from the second set will be randomly shuffled, etc.
- in the same order as they can be found in the set – if you don't use all questions in the question set, the first n questions in the set are selected in the order they are defined in the definition file. If you are using all questions from the question set, they are used in the exact order they appear in the definition file.
- 9.How many times can the student launch the ROPOT session and can he/she see the correct solution?This also depends on your choice. Access to the correct solution is set in the "Display the correct answers to students after they have finished working with the ROPOT application" section:
- display answers to correctly answered questions only: if you tick this option, the correct answers for incorrectly answered questions will not be displayed. The student will only see that he/she answered the question incorrectly. If he/she is allowed another session, he/she can try to answer the question better.
- immediately after the submission of answer form:once the student has submitted the test, he/she will be able to see the correct solution and the points obtained by clicking on the "View" button.
- display automatically right after the users have finished working with the ROPOT application: immediately after saving the test, the student will be automatically redirected to the page with the correct solution.
- after the period during which the ROPOT application can be worked with: the student will see the correct solution after the period during which the ROPOT can be worked with (see below). Until then, the student will not see the scores for each question. If you still want to tell him/her the overall result, use the transfer of the scores to the notebooks (see above).
- never: the student will not see the correct solution, a typical setting for real testing. Can be enabled to show scores in the session list.
- display all the answers after x attempts (unless all the questions are answered correctly earlier): the aim is to make students think more about their possible mistakes in the practice test by preventing them from viewing the correct results immediately after the first attempt. Instead, they have the opportunity to take the test several times, knowing that they did not get everything right. If an option is set that allows multiple different sessions to be generated at the same time, attempts are counted separately for each session generated.
This number of attempts limits only the access to the answers; the student may do the actual answering in more attempts than is the number entered here.
- only from – to (this option is not recommended): the student can only open the correct solution view at the set interval. (If you select the option and do not fill in the values, the student will always view the solution.)
The time limit for displaying the correct answers does not guarantee that students will not take pictures, email them, etc. Therefore, do not use this option if you have a serious interest in keeping the correct results secret.
- maximum number of times the test can be evaluated (if no number is provided, no limit is applied): the number of test evaluations does not include saves (using “save and continue” button), because these do not result in an evaluation of the test. The test is scored only after it is submitted.
If you need to count the number of times the ROPOT is launched instead of the number of times it is evaluated, tick the option "count the number of times the ROPOT application (test) gets opened (not evaluated)“. - Yes, they should and some other questions should be offered to them next time they work with the ROPOT application:: the term "session" means that the student launches a blank, new test. You can set this parameter even if you use all the questions in the question set. In that case, the student will have a clean test in front of him/her again and will have to fill in everything again. If you use only a certain number of questions, the student will work with variations of the test (the selection of questions is random!). For this option, you can disable the ability to answer sessions already launched.
- Yes, they should, but it is always the same form (same questions) that should be offered to them: this means that a student can only take the new test once. After that, he/she can only correct his/her answers, he/she will never have a blank test in front of him/her again.
- no (once you open the ROPOT, you cannot reopen the ROPOT sometime later and change the answers): this is a typical option for testing. Re-opening is not possible even before final submission.
- No, never (select this option provided the test is to be scanned and you only want to make it available for browsing): this option will not allow the student to lauch the test. It is only used for scanable tests where the tests are written on paper. You can make the view of the tests available in the "Display the correct answers to students after they have finished working with the ROPOT application" section.
- 10.It is uncomfortable to navigate through a ROPOT with a large number of questionsYou can split the ROPOT into pages. In the description in the "Number of questions per page" section, you specify how many questions to display on the page (screen) or whether to use a single page for questions from one question set only.
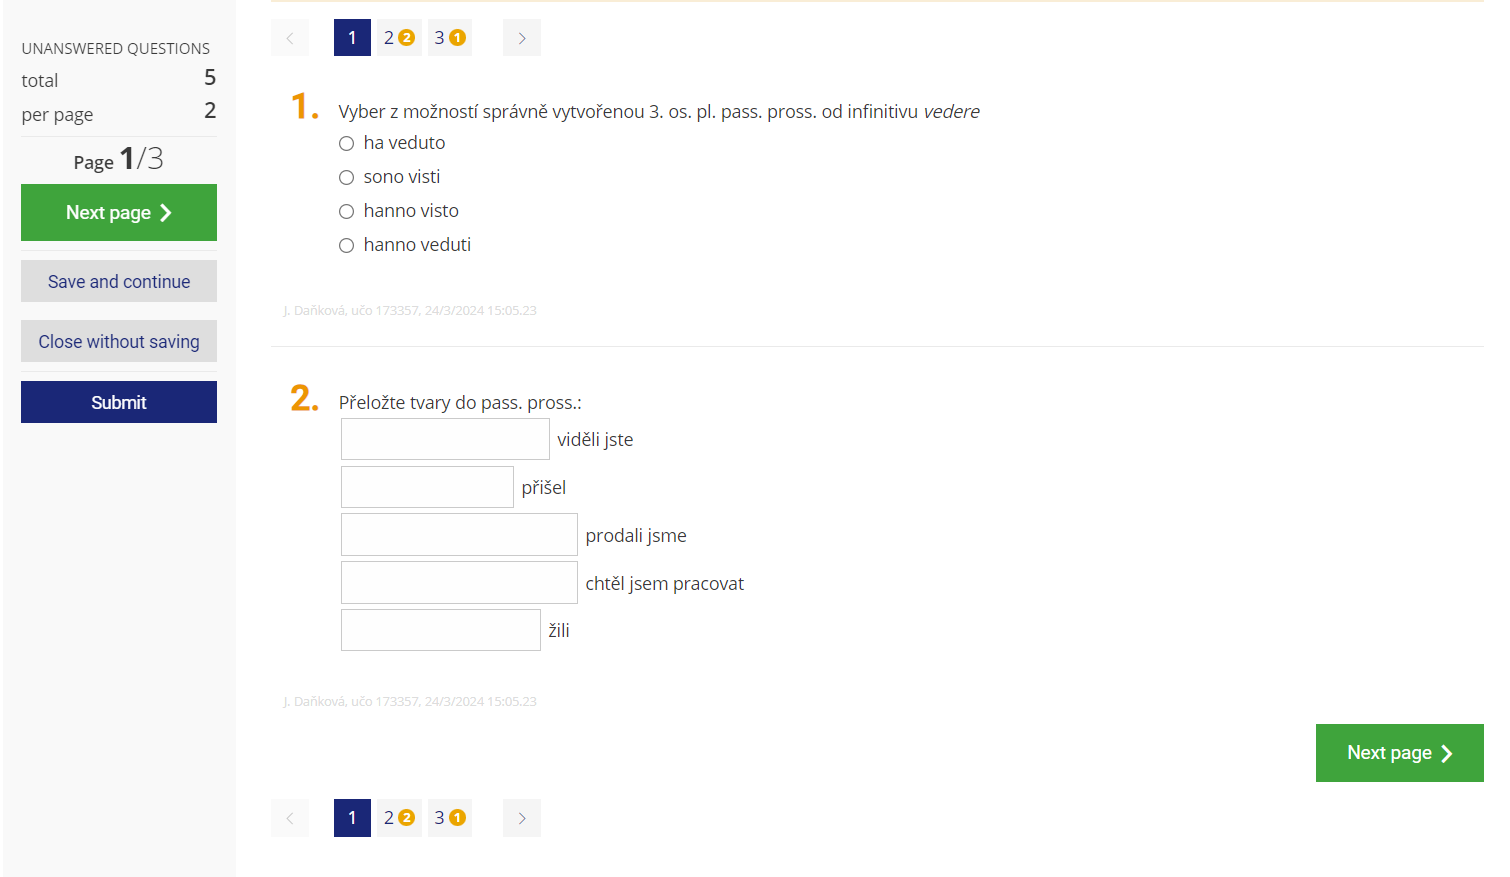
1 Sample of the ROPOT set up to have two questions per page.
Pages can also be divided by question sets (by selecting "use a single page for questions from one question set only"). One page will then contain continuous blocks of questions that are drawn from one question set. - 11.I want to set who is allowed to work with the ROPOTIn the "Rights and times group" section, you need to set who is allowed to work with the ROPOT. Select the desired option via the "Add another right" button and click on "Add the right and make further specifications". If you have selected e.g. "students enrolled in the course offered in a concrete term", you have to confirm the selection once more by clicking "Add the right". If the operation was successful, the message "No access rights have been specified for this ROPOT application yet and thus no one is allowed to work with it at the moment." will disappear and a table with the details of the assigned rights will appear. It is also possible to specify several different time and rights groups.

1 Form with two rights groups entered.
- 12.I want to limit the time responding students can spend working with the ROPOTThere are two basic options: specifying the from-to interval and the total number of minutes the ROPOT can be worked with.
- Setting the from-to interval (period during which the application can be worked with)
You can select the date and time from and until which the ROPOT can be worked with. You can either enter both data or only one of them. You can set more than one interval for accessing the ROPOT. - Setting the total time for the test
Another option is to specify the total number of minutes that the ROPOT can be worked with. The time is counted for each person separately from the moment the ROPOT session is first launched. Although the teacher can set the student to return to the ROPOT session and work with it repeatedly, the total time is still counted from the first time the ROPOT session is launched. - Combining the two methods
You can combine both types of time restriction. The limit that expires first will apply. For example, you have a ROPOT where the interval is set to 15:00 to 16:00 and 10 minutes. If a student launches the ROPOT at 15:55, they will only have 5 minutes to answer it. If he/she opens it at 15:00, he/she will have 10 minutes.
The combination of time constraints can be used, for example, in real examinations for grades. For example, you want to give students 30 minutes of time and at the same time you don't want students to lose some of their time due to a delay in the start of the test. In such a situation it is convenient to set the interval e.g. 10:00–11:30 and at the same time the total number of minutes to 30. Each student will have 30 minutes to work and it does not matter whether he/she opens the test at 10:00 or 10:05. Only students who open the test at 11:01 or later would be disadvantaged.
You can do the same in tests designed for practice during the semester. For example, you want students to work with the ROPOT repeatedly over a period of time (e.g., March to May), but only for a limited amount of time (e.g., 20 minutes). In this type of testing, you need to have the parameter "yes, they should and some other questions should be offered to them next time they work with the ROPOT application". This is because if you set it to "yes, they should, but it is always the same form (same questions) that should be offered to them", the time from the first time the ROPOT session is launched is counted. In our case, if the student saved the test after 10 minutes and came back to it after half an hour, he/she would not be able to work with it anymore because the 20 minutes would have passed in the meantime.
Multiple periods during which the ROPOT can be worked with is useful in the case of tests on multiple dates for different groups or seminars within a course or courses using shared study materials. This eliminates the need to create multiple ROPOT descriptions for a single test that is intended for different groups of students. It is also important that all groups of students who are to work with the ROPOT at a given time also have the appropriate rights assigned. For example, you want to give one test to two groups of students. The first examination date is at 10:00, the second at 14:00. In the ROPOT description, you set the date and time in the first line to, for example, 10:00–11:00, and in the second line to 14:00–15:00. Thus, one description is used for two examination dates.
With both types of time constraints, the student can see how much time is left. For the last 5 minutes, a red warning appears on the counter indicating the end of the test and flashes for the last minute.

1 Students see that the time for answering the ROPOT is coming to an end.
- Setting the from-to interval (period during which the application can be worked with)
- 13.I want to make the ROPOT available to different groups at different times
Different combinations of times and rights can be set within a single ROPOT description.
For example: a teacher teaches three seminar groups, each learning on a different day, and he wants to set up one ROPOT for all groups so that only students from a particular seminar group can always answer on the day they are learning.
For each seminar group, via the "Add another rights and time group" button, the teacher inserts a section within which he/she sets the right for the specific seminar group and sets the time when the student is allowed to launch the ROPOT session.
This way, the teacher doesn't have to set up three different ROPOTs, but just one.

1 Example of the use of rights and time groups – one seminar group will view the ROPOT on one day and another on another.
You can also add a special rights and time group. This option is mainly used to set up ROPOTs for students with special needs (typically used by Teiresias).
- 14.What if a student fails to submit a test on time?If the student does not submit the test within the time limit, the system will do it automatically when the time limit expires. This feature does not need to be set up, but it cannot be cancelled either. In this case, the student just needs to wait for the ROPOT application to notify him/her of the automatic submission with a message in the modal window. It is a good idea to inform students of this fact when taking the test.
- 15.Will the student lose all answers if an error occurs when saving the test?In order to avoid cases where a student accidentally fails to submit a test for some reason (e.g. due to a computer crash or internet connection failure), students can use the "Save and continue" feature when completing the ROPOT. In this case, when the ROPOT session is launched again, the student will have their previous responses saved as they were when they last saved continuously. If you want to minimize the risk of a student accidentally losing their answers while completing the ROPOT, it is a good idea to warn students of this feature in advance. You can also use the "Remind to save continuously" option in the ROPOT settings (traditional design), where you can set a time limit after which the student will be reminded on the screen for a short period of time that they should use the "Save and continue" button. In case you are already preparing ROPOTs for students in the new design (and not in the traditional design, you can find the settings in the form under the option "ROPOT design"), ROPOTs are automatically saved for all students after 10 minutes.
- 16.How do I make accessible the ROPOT to students?You make the ROPOT available to students by both assigning rights and creating a link to the ROPOT. If you want to test the ROPOT before publishing it, then do not set the rights yet and save the description using the "Save and make inaccessible to students for now" button. Only when you decide to publish the ROPOT, proceed viaThe Information system Teacher [course selection] (ROPOTs and Quizzes) Work with ROPOT [selected ROPOT]again in the ROPOT description. First, set the access rights (see the question I want to set who is allowed to work with the ROPOT).The next step is to create a link. The link is a new file with a special type .qref (questionnaire reference). You create it by saving the ROPOT description using the "Save and make accessible" button. The default location of the link is in the Study Materials / ROPOT (Revision, Opinion Poll and Testing) folder. You can change this location by using the "Change" button in the "Making the ROPOT application accessible to students" option by inserting a different address. Students enrolled in the course also see a link to the ROPOT on their student page where all e-learning related links are collected:
You have to assign rights in the ROPOT description, it is not enough to set them in the file manager (you don't have to set them there).
The Information system Student Teaching ROPOT (Revision, Opinion Poll and Testing)
1 Overview of ROPOTs in the Student agenda.
Provided you have failed to find the information you were searching for, you can contact us at  slu
slu cz
cz